"As for me and my house, we will serve the Lord." Joshua 24:15
Showing posts with label Ruby. Show all posts

11.15.2010

Cake Pops!

Here is a disclaimer before I post these:
Many, many bloggers have posted cake pops before me, and probably all are better than mine. As far as I know, the original, inventor and reigning queen of cake pops is Bakerella, and you must click over and look at all her gorgeous creations. Wait, don't click yet. You'll never come back. But she does have a book out now! How cool is that? And her pops are amazing!

These are my lame interpretation. They are improving but I've discovered there is a bit of a learning curve with these. Fortunately they are super fun to make and unfortunately really, really delicious. Somehow a few of mine always seem to fall off the stick while dipping and I am sadly forced to eat them. 

Ok, here's my little photo tutorial...

You will need:
Cake mix
Container of frosting
2 bags of Candy Melts (I buy Wilton brand at Michael's in the cake/candy making aisle)
approx 50 lollipop sticks (any length, but I prefer the longer ones)
Styrofoam or floral foam blocks
Sprinkles, if desired


Bake a cake. Any cake. Homemade, from a mix... whatever suits you. 
I made a chocolate cake from a mix. Well, actually hubby made this. While babysitting my friend's two kiddos. And taking care of ours so that I could have kid-free shopping day. Is he amazing or what??

Let cake cool completely. This is important. I usually bake it the day before I actually make the pops. Then dump the cake into a big bowl. Break it up a bit if needed because you are just going to crumble it...


...like this. Nice and fine. A few bigger bits are ok. I use my hands for this part- gets pretty messy but it's oddly meditative. 

Now grab your frosting- any kind. The pops themselves are a bit of a process so I just use store bought. But you can make homemade. If you're an over achiever. 

Now scoop almost the whole container into your bowl. I use a big spoon to stir it all up. Add a little more frosting if needed to make a rollable but not too gooey texture. They need to roll up into somewhat firm little balls. Like cookie dough. 


I place them onto a huge cookie sheet covered in wax paper. I usually get 40-50 pops from one cake, depending how big I roll them. Here's a little tip: roll them smaller. The bigger they are, the heavier they are. And heavy cake pops fall off the sticks while dipping. Then you have to eat them.

Now put your candy melts in a bowl, or two bowls if you are using two colors. I've discovered a shallow bowl makes it easier to dip. Melt them in the microwave according to package instructions. Stir and microwave more until creamy and pretty thin. The candy in the photo above is too thick. Heat more. 

Dip the tip of each stick into a little of the candy and stick into each ball, about 3/4 of the way through. 
Then take your cookie sheet and put it in the freezer for 10-15 minutes. I always have to clear a space big and tall enough. If you don't have space, do these in batches on smaller trays. You can remelt the candy as much as needed. 

Once chilled, it's time to dip! You may need to melt the candy a bit more at this point. Make sure to cover the ball all the way, so the candy touches the stick. This keeps them on the stick a bit better. (I accidentally dropped some sprinkles in my bowl of candy melt... oops.)

I love they way they look with matching sprinkles on them... almost like glitter. If you use any sprinkles, do it right after you dip each pop while the candy is still wet. 

Then stick each pop in the foam block to harden. I find that I sometimes have to stick the un-dipped pops back in the freezer once or twice during this process... if they get too warm they start to fall off the sticks while dipping. Then, again, you have to eat them.

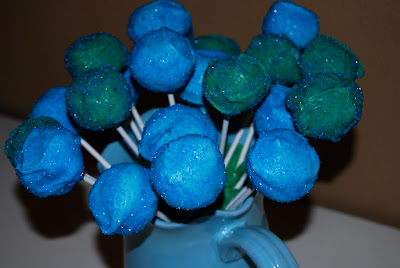
I got a bit inventive while making this batch and crammed some floral foam into a couple cute, tall containers I had. Then covered the foam with tissue paper, and stuck my finished pops into that. It looked so cute! 


These were for a baby shower, to celebrate my cousin's baby boy arriving in January. I love the blue and teal together. 


I did not, however, love the brown. Most of the candy melt colors are flavored vanilla, but the brown (naturally) is chocolate. YUM. But just not as pretty. So I set aside these four for momma-to-be. Or her kiddos. But pregnant mommas sometimes need four double chocolate cake pops. 

Click here to see my bee-shaped cake pops for Beckham's first birthday party. They were my first batch ever. I think I'll be sticking with these round, solid color ones. :)


These red ones I made for my sister-in-law's baby shower... the theme was Ruby, so I used red velvet cake. :) And speaking of Ruby, she arrived 11 days ago and is the most adorable, perfect, sweet little girl you could imagine! Love her. 
Notice the foam blocks covered in tissue paper? Sure wish I'd have thought of the foam-in-a-cute-container idea sooner.


This batch was for a friend's daughter's birthday party, and I decided to keep it simple and do them upside-down to avoid the whole foam block situation. They still looked super cute on a fun platter, and this was definitely easier. But I do love the way they look standing up.


Don't forget to make your laundry detergent to donate to a shelter and come back and enter my giveaway!!

9.24.2010

A week of Ruby: day 8

For weeks I pondered a creative way to present all the fun gifts for Ruby to my SIL at her shower. I wanted something somewhat useful, rather than just another gift bag. But I couldn't come up with anything unique!
So there it was, the day before her shower, which also happened to be my birthday. After some shopping at Lush, we were driving home for Beckham's nap, and Mike had this sudden inspiration. 

"Don't we still have that brown storage ottoman around somewhere?"

"yeeahh...."

"let's spray paint it and recover the top, then put all the gifts inside!!"

Ahhh, my brilliant and endlessly creative hubby. Love him.

We just so happened to be within a mile or so of a huge fabric store, so we stopped. And I just so happened to stumble upon the prettiest fabric!!
I sent Mike to the hardware store while B napped for some spray paint...
then after getting home from my wonderful birthday dinner and putting the boys to bed, I got to work.

So, here is the before pic (but I had actually started priming it already- almost forgot to take the pic!)...


....and after it was mostly primed...


Here is the lid after I covered it with new fabric! This was so easy- just lots of pulling the fabric tight and a staple gun. 


And the finished product! Didn't realize how blurry this photo turned out...


But you can see it better here. Pretty, right?! It sure made a cute gift box!


It's been so much fun sharing all these projects with you, my dear 13 loyal readers! ;)
Promise to lay off the sewing posts for a while... although I have some fun stuff up my sleeve. All in good time. :)

9.23.2010

A week of Ruby: day 7

A few months ago I saw a mom carrying her new baby in a carrier with one of these covers, and I thought it was so brilliant. 


Keeps baby out of the rain and cold without having to bundle her up. Like having a blanket draped over the carseat, except this allows the handle to be exposed for waaay easier carrying! Plus it won't blow off on those windy, rainy Oregon days. 
And the bonus of keeping strangers hands away from a new baby! I can never believe how many people think it's ok to stick their fingers all over someone else's baby's face. 


I think Ruby will be nice and cozy in here, and hopefully sleep a lot while mom runs her big brothers all over town!


The little straps just velcro onto the carseat handle. And I had to add little bows.


It's lined underneath with a cute teal polka dot. The outer fabric I have loved for sooo long. I actually had it in mind for nursery bedding if Beckham had been a girl. It's called Starling by Alexander Henry. There's also a layer of batting between the two to keep her extra cozy. 


Hmm. Don't mind my crusty old carseat that's been well used through two boys. I had to try the cover on to make sure it fit! And to see how cute it looks! Will be much cuter on Ruby's pretty new girlie carseat. :)

Ok, I know a week has only 7 days. I do suffer from mommy brain at times, but I swear it's not that bad.
But I just have one more thing to share! It was a very last minute idea and it turned out great! It's not exactly a sewing project- more of a repurposing project, which I love doing!
So check back tomorrow for one more fun thing for Ruby!

9.22.2010

A week of Ruby: day 6


I've had a lot of fun appliqueing felt critters to onesies, but have always hand sewed them in the past. This was the first one I attempted to sew by machine!


After some trial and error I used a very short stitch length and went super slow.


I love the way this fat little bird turned out! And so much faster and neater looking than hand-sewing.

Here's another attempt at a quilt...


Love the fabrics! Not so much my quilting skills however. I can never seem to get every corner to line up. 


These are all cozy flannel fabrics, so I think it'll make a good floor blanket for Ruby to lay on, or sit and play when she's a bit older. 


I appliqued a little 'R" to the corner... hoping the edges will fray a bit to give it a weathered rustic raw look. (Still not quite right... can't think of the word I'm looking for, but I love the look of frayed edges around letters on shirts, so I thought it would be cute on a blanket too.)


The back is super snuggly.


I don't love the binding... this was the first time I used packaged quilt binding as opposed to making my own and I didn't do very good. It's a completely different method than what I'm used to. It really needed to be sewn closer to the inside edges but I was so afraid of missing the back of the binding and having holes!
Oh, well! It was really fun to make and each one will get easier than the last, right?


Tomorrow I'll be posting a very cool "invention" (not my own) that I so wish I had when Beckham was a newborn!

9.21.2010

A week of Ruby: day 5


Here is the cute little bird mobile, possibly my favorite project!


These little birds were simple and fun to sew, and will hopefully be perfect in her bird-themed nursery!


I found an online pattern for them, but can't for the life of me remember where....


The decorative wreath at the top was a craft store find, and I love the way it looks! Very bird's nest-y.


Every baby needs a fun mobile- Beckham adores his owl one! Sure hope Ruby loves hers!

Come back tomorrow for another fun bird themed craft!

9.20.2010

A week of Ruby: day 4

I've been eyeing this fabric for so long, so when I started sewing for Ruby I knew I needed to make her something out of it.


It's minkee, so it's ridiculously soft and cozy. Love it.


So I made her this cozy little lovey blankie... I added ribbon loops since babies love to rub them between their little fingers. 


It's hard to tell, and the color is really off in this photo, but the back is a dark brown minkee with a paisley pattern. So pretty!


Such a fun little project- and very quick! These would be perfect little baby gifts to make ahead and have on hand!


Ok, I could not resist these shoes.


They are way too big for Ruby- 12 to 18 month size... but she won't really need shoes until then anyway. Not to say she won't have them- the girl has a better shoe wardrobe than I do and she's not even born yet. But anyway, aren't they to die for?!


They are actually dark brown! It's hard to tell, but such a pretty color combo. 
Had to buy them. Physically could not leave the store without them. Getting more and more thankful every day that I have boys. Sweet, grubby, wild, dirty, awesome boys. Who only need 2 or 3 pairs of shoes and they are set. :)

9.19.2010

A week of Ruby: day 3

Oh sweet girlie girl bliss. A tutu! The most practical of baby gifts. ;)


But soooo pretty! Kinda want one for myself.


It ended up bigger than I meant it to be... I just went crazy adding tulle strip after tulle strip. I wanted it fluffy! May not fit her until she's bigger, but that's ok. 


I used elastic all the way around, but a big satin bow to tie it together. I'm hoping that will make it more adjustable so it can grow with her. 
What a fun project. :)


These are less exciting but still cute and waaay more practical!


Just some simple little flannel washies. We use single layer flannel cloths like these as baby wipes with our cloth diapers, but they also make awesome little wipees for runny baby noses since they are so soft. And also for keeping in the kitchen for after meal clean up when she's older. I like having some thin ones for jobs like those, and the thick wash cloths for bathtime. Plus they are just plain cute.


When shopping for flannel for Ruby's wash cloths I saw this print that I loved for Beckham. Cloth baby wipes get very discolored.... as you can imagine. And bleach just ruins them, so I sun them when I can but it just doesn't get them bright white again. So I thought, why on earth do they even make white cloth baby wipes?? We all know what we're gonna wipe up! It's not white! This is a nice dark print that hopefully won't show the stains as much. I plan to use them in my travel wipes container- keep the ugly but still functional ones at home. :)

And again, more goodies to come tomorrow.